Friday, July 9, 2010

Now finally, the floor, where it all started

Finally we're ready for the floor.  I had installed the outer rocker panels, inner/outer wheel housings, both quarter panels and the toe boards on both sides of the lower firewall.


In prepration for the floor we installed the cross braces and also insered the inner rocker panels.  I was able to use the dimensions on the frame to layout the cross braces since two of them have body bolts going to them.  Another trick I started using at this point in the project instead of the cleko's were sheet metal screws.  They are stronger and easier nearly as easy to put in, they also provide a nice size for plug welds.


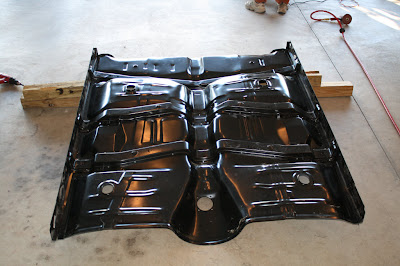
This is the new floor including the toe boards which required a bit of work since the entire area at the bottom of the firewall was missing. 


The piture speaks for itself.  The new floor is in and overall fit quite well and I think the best thing is that it's a one-piece item so it really makes life easy when you do have to replace the entire floor.  I did have to use a strap to bring the width of the body at the rocker panels together to the point where it was consistent. Other than that it went together much easier than I expected.  I think the key was replacing the entire floor including braces and rocker panels, this simplified the work.

Monday, July 5, 2010

The Driver Quarter Panel

The drivers quarter went much faster than the passenger.  I learned a lot about how to efficiently remove the rocker and quarter panels so that I was able to preserve the inner structure but also not waste time drilling spot welds. It's much quicker to use a air chisel and sawzall to remove the large section you see below and then work on the edges carefully to preserve the necessary parts that will remain after the quarter is removed.


Since we're replacing the trunk floor and rear panel it's not necessary to preserve much other than the end location for the rear panel.  The most effort removing the quart panel went into the area adjacent to the roof.


Here again you can see a number of braces were needed to maintain the overal shape. Once the quart was removed there were limited remains of the previous structure


Here's one of the first test fits for the new quarter panel.  The drivers quarter panel was actually completed over the 4th of July weekend which made me feel much better since the previous one took over a year :)


Sunday, May 30, 2010

The Passenger Quarter Panel

The next project I worked on was the passenger quarter panel, rocker panel, and inner/outer wheel housings.


The picture above says it all, this car was a mess and has taught me a very big lesson about inspecting a car in much greater detail OR the other option is to really start with a project and not a finished car.  The air chisel made the work really easy, at least getting the large sections out of the way.  However, there were still tons of spot welds that had to be removed in order to get the remaining parts out of the way.  After reviewing the work on the quarter panels there were gallons of filler used to help make them straight I'm sure.


Above was the first test fit of the new parts, at this point things were moving along quite well. I had to weld in braces to help support the rear tail panel and inner structure and ensure they would stay relatively close when I removed the quarter panel.


This shows the braces and the reality of what was left of the car after removing the quarter panel. Once the quarter panels are replaced the trunk floor and rear tail panel will be as well.  Not much left that remained from the original car.


Finally some progress and things were looking much better.  However, this was the first of 15-20 test fits that were yet to come in order to get the panel aligned well enough.  This was the last work completed in 2009 and the project was essentially put on hold until 2010.
.


Now fast forward to May of 2010 and this is where the passenger quarter panel is at.  I did the final fit and alignment and then used the cleko's to hold the rest of the car together.  You can see here the bracing is still in place to help old the car together.


Now the entire car is sitting on the rotisserie for the first time.  I was really happy to see how easy the entire car moved around and how easy it was to rotate the car.  This is when I figured out that I was not going to be able to rotate the car 90 degrees without modifications to the height.

Next step is the drivers quarter panel...

Sunday, September 21, 2008

The split...


The next step was to split the body and frame from one another. The acutal time to separate them really didn't take as long as I expected. The effort that went into the rotisserie was time well spent and I was able to use one of the stands to connect to the rear section of the car. However, I had to attach the stand to the trunk floor due to the fact the body mounts were rusted as well as the structure in that area. I left the front of the car on the 4x4 so that I could finish the work on the floor and toe boards.


Here's the view from the rear of the car sitting on the stand


Here you can see the frame and entire suspension.  Notice they took the original frame and moved the rear rails inward to compensate for the larger tires, ladder bars and coil overs?  The one good thing they did was they didn't cut up the original rearend.  They took the ralley wheels and had extensions welded in so the offset was inward instead of outward.

Next step is to start working on the removal of the rocker panels and quarter panels.

Sunday, September 7, 2008

The rotisserie project


I took a short detour while working on the car to help make things easier.  I spent the better part of the month of August and September 2008 building my first rotisserie for the body.   I found the design online and proceed to cut and weld the parts together.  This is the first major welding I've done in 15+ years so I was a bit rusty but most of it came back.  At some point in the future a large mig/tig welder is going to be on the wish list to help with the larger projects.  


Here's an update to the rotisserie stand from July 2010.  I had to modify the stands to enable the body to rotate completely.  As you can see I've added a hydraulic jack to the stand.  This gives me a very flexible height adjustment to make it easier to load and unload the body as well as the ability to extend the height to rotate the body 90 degrees with plenty of height to spare.  As it turns out the design worked out quite well to help support the weight and allow the rotisserie to work correctly.

Sunday, July 13, 2008

Beauty is only skin deep


View from the drivers door looking into the front seat


This is where the problem started.  The first thing I did to prepare for the new interior is of course remove the old.  Upon doing so I realized the driveshaft had gone through the floor at least twice.  Then looking further at the inner rocker panels noticed there was quite a bit of rust just below the firewall.

So the idea was to remove the floor and replace it.  The only problem is that the more I uncovered the more I saw that I didn't like and unfortunately the idea of putting it back together incomplete didn't sit well.

After spending some time thinking about the situation I then talked Wendy into restoring the car as a "project" to help give us something to do since we left our house in Geogia which we spent 4 years working on :)

View from the passenger door looking to the rear seat


Once the decision was made I dove in with my Sawzall and cut the floor out from the toe board to the rear floor cross member. 

Passenger rocker panel


After the floor was cut out the next step was to clean up the edges, or so I thought.  I started with a drill and began to drill the first of hundreds of spot welds out.  After drilling I used a chisel and hammer to break th welds.  I spent the first few days using this approach and finally decided it was time to get more power.


Here's the result ... POWER!  I added the compressor and plenty of airtools which have made the job much easier.


The next step was to separate the body from the frame which actually went much faster than I thought.  Since I was going to have to replace most of the bottom of the car I was able to use the airchisel and sawzall to simply cut large sections apart until I had the car separated.  Overall the disassembly took course over 2 weekends.  It's always much eaiser to tear it appart than to put it back together.


Saturday, May 19, 2007

Where it all started....

 
1966 Chevelle SS


Here's the 1966 Chevelle SS that I purchased on May 19, 2007.  The car is an original 138 car (SS396, 4spd, 12bolt) that I found just south of Indianapolis, IN.  Wendy and I made the trip to pickup the car on Friday and brought it home to Woodstock, GA the next day. The original intent was to just replace the interior and enjoy the car since most of the work appeared to be completed.

The engine is a 454 4-bolt main with HI-PERF rectangular port heads. It had a roller cam and rockers.  I was told it had less than 1500 miles on the motor since it was rebuilt. The transmission was a automatic TH400 with a 2800 stall and reverse manual valve body.  The rearend is the original 12 bolt with 4.56 posi.  

In June of 2007 I purchased an entire interior kit from Ground-Up restoration in Meriden, CT.

In August of 2007 I drove my truck with the car and new interior up to Connecticut and put it into storage.  I drove the car a couple of times until we finally moved into our house in October.  Then we put it up for the winter.

In the Spring of 2008 is when the work really started....