Monday, December 13, 2010

Decoding the Fisher Body Tag

I spent a bit of time this weekend decoding the body tag on the firewall and discovered several things.  As the body tag reads from top left to right:

01A = Body was built the first week of January (1966)
66 = 1966 model
13817 = Chevelle SS Sport Coupe
FL1 = Assembled in Flint, MI
2870 = Fisher Body Unit ID, this is the number assigned to the body, not to be confused with the VIN #
763-3 = Black Viynl Bucket Seats
M-M = Upper/Lower Aztec Bronze Metallic Paint
4F = RPO-Z19 Convienance Group

So based on the details I was able to confirm that based on the number of cars built in January in Flint that a reastic build date should have been January 5, 1966. 


As you can see from the body tag the color of the car is red


The two pictures above illustrate the correct aztec bronze metallic color and the one I'll be using for the car next year.   Based on my reading the color will change based on the type and amount of sunlight but overall I expect it to look much closer to the first image above.


Sunday, October 24, 2010

And now the trunk floor


The next step was adding the final large piece to the body which now comes in a one piece floor section.  I was able to get the entire floor with all of the braces pre-welded.  This piece actually required very little modification to fit.  


This is the view from the drives side of the car.  As you can see I've got sheet metal screws holding the floor pan and trunk floor together at this point.  I'm going to finish the remaining body alignment and then take the body off the frame and weld all of the panels together. You can tell from this view there are two cross braces that were cut with a torch by the previous owners in order to get the larger tiers inside the car. I'm going to have to rebuild them once I get the remaining part of the car realigned.


Here's the view from the passenger door, much of the same, just a lot of new sheet metal and screws!


Here's a view of the new trunk from the rear of the car.  With the design of the inner wheel wells getting the trunk to fit really isn't a problem.  I was able to get a nice gap on the drivers side.  I still need to fit the lower quarter to trunk floor panel on the passenger side then pull it all together with screws to finish the remaining section of the trunk.


This is the view from the rear of the car.  I've replaced the tail panel and filler panel from the rear window to trunk in this picture.  The only exterior sheet metal that is left now is the roof of the car.  You can also see the frame that I modified to fit the car by removing a section.  Once I get the body off the car I have a bit more work to do in order to get the frame back into shape.  The frame was hit slightly in the rear and it's just bent enough to notice.  Overall it's about 3/4 of an inch lower than the drivers side. 

Next is to get the trunk lid and align all of the panels in the rear so that the extensions for the rear tail lights fit well in addition to the trunk gaps.

Sunday, September 12, 2010

New frame, rearend is next....

I spent the weekend after Labor Day driving to Poughkeepsie, NY to pickup another frame for the car. I made the decision after all of the work that has gone into the car to replace the body panels that I really wasn't too keen to cut it up again.  The frame came from a 1966 Oldsmobile so in the end there's going to be some work to do but overall it was in good shape.  I had to take about 3 1/4 inches from the rear and I've got to replace the front horns on the frame due to the different style used for the Olds.

However, I was able to use the 10-bolt rearend for the control arm brackets so started by cutting off the spring brackets and control arm brackets. Then began to remove the ladder bar and coilover brackets from the 12 bolt.


Here you can see the before picture. Probably the only good thing the previous owner did with the suspension was not to cut-up the original rearend. I was able to get the brackets off fairly easy so it made the switch quite easily.


This is the finished product in the car.  The original Olds 10-bolt was about 1 inch wider so fitment wasn't a problem. I welded the brackets on with my welder but I'm going to have to get them burned in with a much heavier welder after I get the rearend sandblasted.  This project went quite well and I was able to complete the swap in a weekend.  The hardest part was actually cutting them off the original 10-bolt without mangling the brackets.  A torch would have made the job much easier.

Saturday, September 11, 2010

The body is back on the frame ...

Now that I have a full frame again the next step is to make sure that all of the body mounts on the main shell fit before final welding.  After I sat the body back on the frame I only had to make a few small adjustments to get all 6 of the body bolts back in place so I was quite happy.  This is the first time in over a year that they body has been back on the frame and actually things look quite good!


As you can see the wheels are from a Pontiac but the frame actually came from a Oldsmobile.  There's no trunk floor in the car yet but I was able to get the rear tail panel in place to help hold the rear of the car together.


The picture above shows the difference in the length of the frame as well as how bent the rear brace is.  The frame has to be shortened about 3 1/4 inches to fit the Chevelle.   I also determined after putting the original trunk back on the car that it was not going to fit very well.  I ended up selling the trunk and some other parts.


This picture shows the major work that has to go into the frame to make it align with the Chevelle mounts.  The entire front frame horns need to be removed and replaced with the frame section from the original Chevelle frame.  The ones on the Oldsmobile actually go out at the end so the radiator can fit between them where the Chevelle is straight.

Friday, July 9, 2010

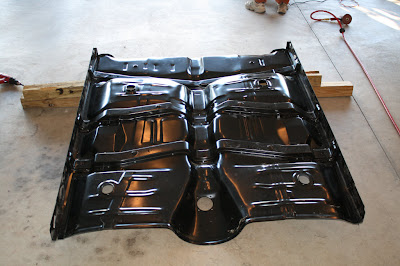
Now finally, the floor, where it all started

Finally we're ready for the floor.  I had installed the outer rocker panels, inner/outer wheel housings, both quarter panels and the toe boards on both sides of the lower firewall.


In prepration for the floor we installed the cross braces and also insered the inner rocker panels.  I was able to use the dimensions on the frame to layout the cross braces since two of them have body bolts going to them.  Another trick I started using at this point in the project instead of the cleko's were sheet metal screws.  They are stronger and easier nearly as easy to put in, they also provide a nice size for plug welds.


This is the new floor including the toe boards which required a bit of work since the entire area at the bottom of the firewall was missing. 


The piture speaks for itself.  The new floor is in and overall fit quite well and I think the best thing is that it's a one-piece item so it really makes life easy when you do have to replace the entire floor.  I did have to use a strap to bring the width of the body at the rocker panels together to the point where it was consistent. Other than that it went together much easier than I expected.  I think the key was replacing the entire floor including braces and rocker panels, this simplified the work.

Monday, July 5, 2010

The Driver Quarter Panel

The drivers quarter went much faster than the passenger.  I learned a lot about how to efficiently remove the rocker and quarter panels so that I was able to preserve the inner structure but also not waste time drilling spot welds. It's much quicker to use a air chisel and sawzall to remove the large section you see below and then work on the edges carefully to preserve the necessary parts that will remain after the quarter is removed.


Since we're replacing the trunk floor and rear panel it's not necessary to preserve much other than the end location for the rear panel.  The most effort removing the quart panel went into the area adjacent to the roof.


Here again you can see a number of braces were needed to maintain the overal shape. Once the quart was removed there were limited remains of the previous structure


Here's one of the first test fits for the new quarter panel.  The drivers quarter panel was actually completed over the 4th of July weekend which made me feel much better since the previous one took over a year :)


Sunday, May 30, 2010

The Passenger Quarter Panel

The next project I worked on was the passenger quarter panel, rocker panel, and inner/outer wheel housings.


The picture above says it all, this car was a mess and has taught me a very big lesson about inspecting a car in much greater detail OR the other option is to really start with a project and not a finished car.  The air chisel made the work really easy, at least getting the large sections out of the way.  However, there were still tons of spot welds that had to be removed in order to get the remaining parts out of the way.  After reviewing the work on the quarter panels there were gallons of filler used to help make them straight I'm sure.


Above was the first test fit of the new parts, at this point things were moving along quite well. I had to weld in braces to help support the rear tail panel and inner structure and ensure they would stay relatively close when I removed the quarter panel.


This shows the braces and the reality of what was left of the car after removing the quarter panel. Once the quarter panels are replaced the trunk floor and rear tail panel will be as well.  Not much left that remained from the original car.


Finally some progress and things were looking much better.  However, this was the first of 15-20 test fits that were yet to come in order to get the panel aligned well enough.  This was the last work completed in 2009 and the project was essentially put on hold until 2010.
.


Now fast forward to May of 2010 and this is where the passenger quarter panel is at.  I did the final fit and alignment and then used the cleko's to hold the rest of the car together.  You can see here the bracing is still in place to help old the car together.


Now the entire car is sitting on the rotisserie for the first time.  I was really happy to see how easy the entire car moved around and how easy it was to rotate the car.  This is when I figured out that I was not going to be able to rotate the car 90 degrees without modifications to the height.

Next step is the drivers quarter panel...