Sunday, January 29, 2012

6 pt roll bar complete!

This weekend I was able to finish the roll bar.  Last weekend my wife helped get the main hoop set but I ended up moving it about 3/16" to get it aligned and ensure it was positioned in the same place both by measuring any visually.   I bought the main hoop and rear struts from Competition Engineering and then bough 36 feet of 1.75 DOM tube from the local steel mill to finish the roll bar.

When I tried to fit the rear struts they were bent too far and were not going to give the look I wanted.   I really wanted to make sure I could keep the rear seat in full and also keep the roll bar tucked tight to the roof.    So I took the struts provided and made a template so the struts could extend further in the trunk as well as tuck up tight to the roof.

Since I didn't use the struts for the rear I ended up using them for the door bars.  This also helped solve another problem with the door armrest not fitting.  I found a few other pictures on-line where they had removed the armrest due to the roll bar fit and I didn't want to have to remove them. 

This gives you a good view from the drivers side and also shows how tightly the roll bar tucks up to the roof.   The one problem I did run into is the location of the seats.  I need to relocate them inward about 1" so that they don't rub on the door bars. 


From the front of the car you can hardly see the roll bar.


The cross-bar that run from one side to the other is about 3" below the door bars and also just below the top of the seats.


Here's a nice view from the rear of the car that shows the rear struts and the location they are welded to in the trunk.  One thing you cannot see is a support bar I welded just below the rear package tray that attaches the rears struts from side-to-side.


Here's a nice picture from inside the car, it's a little out of focus but does show how the rear struts are tucked up tight to the roof and follow the angle of the rear window

Sunday, January 22, 2012

More trunk hinge mods, interior welding and roll bar

After last weekend I was able to get the trunk to stand up straight on it's own.  Only problem was after I closed it for the first time the bars that hold the trunk up came apart from the hinge.  So the first thing I did was fabricate new ends and welded them on the existing bars.  I also extended the bar about 3/4" on the inside so it will not come out of the hole.  We'll find out once I put the trunk back on if this was enough.


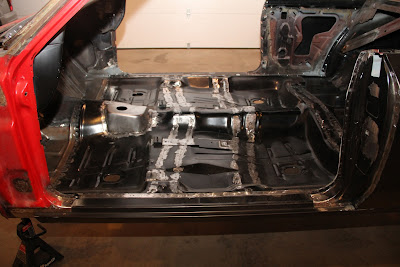
The next area I focused on was finishing the interior spot welding.  I went across the passenger side door sill again and also finished the inside wheel well spot welding.  After that was finished I was able to start working on the roll bar. 

The first step was to cut up some 6"x6" pieces of 1/8" plate to mount the roll bar to.  I had to contour the plate a little bit so that it followed the floor pan.  


You can see in the picture below the location of the plate for the main hoop.  My wife was kind enough to come out for a few hours and help get the main hoop in the right place.  We ended up cutting about 6" off each end to get the main hoop to fit correctly.  If you measure from the top to the bottom I ended up with 41" 


To get a general idea of where the front bars would end up being I leaned a few of the bars I bought for the frame in the door jams.  Next up is to get the rear bars set into place.  I bought the rear seat saver bars pre-bent so hopefully they will fit fine.  One thing is for sure you need to measure twice and cut once!  It takes a little longer but it'll look better in the end.

Sunday, January 15, 2012

New welder, Trunk repair and finished X-Braces

This weekend I spent building a new stand for my new welder.  I have been using a Lincoln Electric 3200HD which runs on a standard outlet to do all of the welding thus far.  I've built the rotisserie, welded the frame and plenty of spot welding on the panels. It's done a great job however with the intent of putting in a roll bar all of the reading on-line and in the manual from Competition Engineering states that you shouldn't use Flux-Core (InnerShield).  So I went ahead and upgraded to the Lincoln Electric 180HD that use 240v and can MIG weld up to 3/16" without problems.  Since the roll bar is just under 1/8" the welder will do just fine.  With Flux-Core (InnerShield) you can weld up to 1/2" in a single pass, this is double what the 3200HD can do so it should be plenty for what I need to do in the garage.

I had a lot of scrap 1"x1"x1/8" tube that I used to hold the body shell of the car together when I was replacing all of the panels.  So it was a good use of the tube and also gave me time time to practice with the new welder.   I made the stand a little shorter and with heavier steel so that it wouldn't tip over like the other one did.   The new welder weighs in at nearly 70lbs and with the cart, tank and 10lbs of welding wire it's well over 150lbs.  


Here's a view from the rear, I went ahead and mounted my extension cord box and attached the cord to the cart. this will make clean-up much easier.  I was also able to use a piece of round stock to help hold the tank in place,  I spent a bit more time working on it than I wanted but it came out looking much nicer.


Over the course of the last 2 weekends I've spent working on the trunk hinges.  When I bought the car they had torched these so they could fit the large tubs in the car so I had to fabricate these from flat sheet metal.  However, I was able to use several pictures and get the outcome very close to factory.  There are some impressions missing from the steel but after some trunk spatter is sprayed you won't hardly be able to tell.  Below is the drivers side and then the passenger side.   


After I finished fixing the brackets I had to fix the actual steel rods that went from one side to the other since they were also cut with the torch and someone actually welded them to the brackets so it made for quite a mess to fix.  The nice thing at the end is that the trunk stays up on it's own now!  I need to make a few more adjustments but all in all I'm quite happy with the outcome.


Here you can see the final welded version of the x-braces that are behind the rear seat.  After getting these fixed and the trunk they were the last remaining large missing pieces that I couldn't purchase.  I probably have 40+ hours into fixing the x-brace and trunk hinges but now that it's complete I think it was worth it since it will help return the car to a near factory look. 


I've finally got all of the steel together for the 6-point roll bar that I'll be installing. I got the main hoop from Competition Engineering which is actually only 20 minutes from the house so I was able to save on shipping.  I got the rear struts as well from them so that I can still have the back seat in the car.  When I got the hoop and rear struts they were out of the kit to do the rest of the car so I went ahead and got it from a local steel company.  I was able to get a great deal on the steel and plate, I got 36 feet of 1.75 x .125 DOM tubing and a piece of 18"x36" 1/8" plate to weld the tube to the floor.

The plan is to finish the spot welding inside of the car and trunk area and then start working on the roll bar.  I've probably got another 2-3 days of work to get the spot welding finished on the inside of the car and the trunk area (lot's of welds!) so it'll probably be later this month or February before I can start the roll bar.  The other area that I'm going to be adding steel is on the frame by boxing the frame and then adding some tube steel to help provide a more rigid frame.  

Monday, January 2, 2012

More welding on the floor braces and rear x-brace

As my vacation comes to a close I made a little more progress on the inside welding over the last two days.  The first area I completed was the seat brackets for the buckets.  The floorpan comes setup for a bench seat so there are 2 brackets you have to position and weld into place in order to mount the buckets.  The one issue I ran into as that there appears to be conflicting ways to put the seats in the car.  I found several pictures (most) where the lever to move the seat is on the inside (near the driveshaft tunnel) and then there were a few with it on the outside.   The good thing is that the seats will mount on either side, I actually tried both ways and the inside lever mounting was the way that it was when I purchased the car.

In the pictures below you can see the seats positioned in the car and they line up quite nice.  Although after some test fitting I did notice that the drivers seat leaned to the rear a bit more (about 1/4") than the passenger.  There are some steel "L" shaped braces that stop the seat when you put it back so I'll have to adjust/bend them to make the seats align correctly.


Here's the drivers side seat brackets with the seat removed.


And the passenger side,  The brackets are a bit hard to see in the picture but there is a small piece to the front and outside corner with a bolt and then the large plate with two bolts towards the driveshaft tunnel.


Here's a picture of the cross-braces nearly 100% completely welded.  When I bought the floor pan they didn't have a 1-piece floor with the braces welded in place so you had to buy separate parts.  They now have the 1-piece floor, and my advice is to get it!  It'll save more than a day's work.


This shot shows all 3 braces .... a spot-weld every 3/4" to 1" which is more than required I'm sure but it shouldn't go any where.


The next project was to repair the x-brace in the rear seat that was torched out when they added the large wheels to the car several years ago.  I looked at a lot of pictures .... the one below giving me the best idea of how it looked from the factory.


This is the design that I went with that is slightly modified from the original but given the difficult bends simplified the approach.  I started by taking some flat 18 gauge steel and forming it to closely align with the x-brace pattern.  Then added a piece of flat steel to fill in from above the inner wheel well to the bottom of the x-brace.  On the bottom I added another piece of steel that tied everything together and to the floorpan.


Here you can see the difference with what I started with and the final design.  On the left everything that is red is from the original and will need to be filled in with the same pattern as the drivers side.


The picture below was taken from the trunk and from the distance closely resembles the factory look.  With a little more welding and grinding then some paint it should look nearly factory from the inside of the trunk and obviously with the seat in place it'll work just fine.  The best part is that this has added a lot of strength and tied the sides of the car together which is what was intended by the factory.