Sunday, December 30, 2012

Trans Support Complete & Body on Frame

I finally spent time and built the custom transmission support out of 1 1/2 by 3/8 square tube.  I modeled it after the factory piece as far as shape and size.  Hopefully the headers and exhaust will clear without any problems.   As of right now it's got some large tack welds so it's possible to make adjustments but overall it fits pretty good.  The one area that was not easy to set is the height of the back of the transmission.   I set it based on what I measured which had the trans mounting point 1/2" below the location of the outer transmission support however it really doesn't look correct.  I've got to find another way to measure or use an angle finder to ensure it's in the right place.


Here you can see how complex the part was to build, there are several angles to factor in but it turned out pretty good.
 
Here you can see just before the frame was rolled under the body.  I was able to use a engine hoist to hold the front of the body up and the rear stand on the back high enough to roll the frame underneath.  It was actually quite easy and something you can do as a one-man job.


Hopefully this the 2nd to last time I have to take the body off the frame and put it back on.  The next step is to complete all of the mock-up and panel alignment prior to paint.  Most of the serious body work is complete but there are several additional adjustments that need to be made in order to ensure the body panels fit correctly.  Also with the addition of the Hurst V-Gate shifter I need to make a few cuts and adjust the floor to allow the larger shifter to work correctly.
 
 
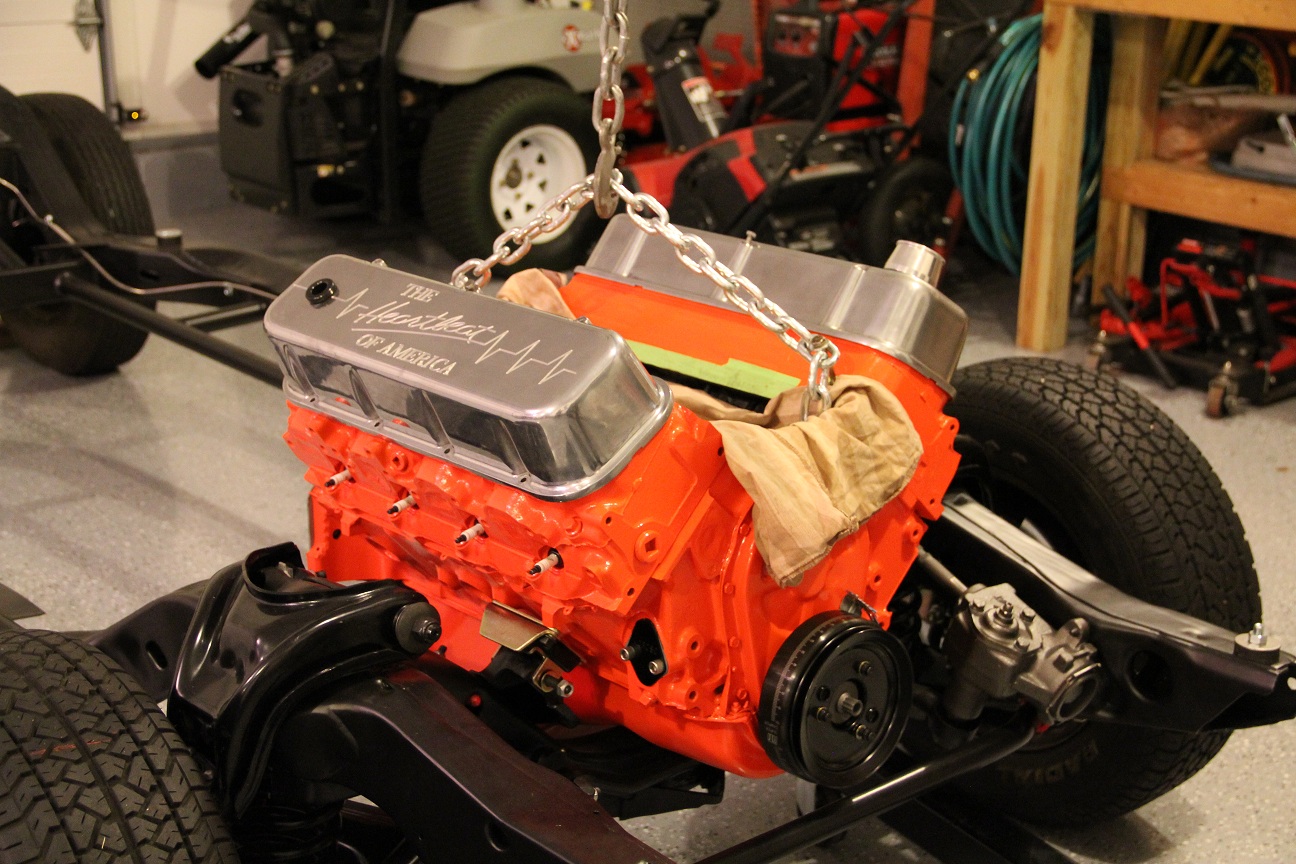
Nice close-up of the engine and clean firewall.  The plan is to keep it as clean as possible, I'm going to mount the MSD ignition box on the firewall and leave the contour in the firewall.  I've seen a lot of them that have been completely filled and it looks too clean.
 
 
I picked up a new radiator core support as well and mounted it, so far so good.
 
 
Next up I'm going to work on the floor and shifter to get it mounted correctly then I'll go ahead and mount the new trunk lid and then the doors, fenders.
 

Sunday, November 11, 2012

The frame and body get closer...

This weekend I was able to add the new Wieand waterpump along with the alternator that was on the car before which cleaned up quite nice.  In addition to the front accessories I also plugged the unused holes in the intake and waterpump with allen plugs.   Once that was complete I spent a while (2 hrs) trying to prime the motor and eventually got everything working just fine with oil showing at the top of the motor on each rocker arm.
 
After the work on the motor I finished the rear drum brakes and got everything set (I think...), I also added the self adjusting kit.


I aslo added the Competition Engineer adjustable front shocks with the setting at 90/10 for now.  I purchased a used set of Competition Engineering shocks for the rear but I'm going to go ahead and order a new set.

 
In order to make room in the garage I went to Harbor Freight and purchased 2 sets of the car dollies to help move the frame around the garage a little easier.  The frame and body have not been this close in years!
 
 
I'm going to take a break for a few weeks to catch my breath and also wait till there is a bit more time over the Thanksgiving holiday.   Coming up next .... :
 
- Fix the clutch z-bar
- Build a custom trans cross-member
- Add some relief near the front cross-member and oil pan
- Protect the frame/engine and bolt the body back on the frame to begin the panel alignment


Sunday, November 4, 2012

Rolling Chassis with Engine & Trans

After installing the motor and inspecting...the oil pan sits very close to the cross-member on the backside on both sides of the pan.  I'm going to try to add some 'relief' on both sides to ensure there is enough clearance.  
 
 
Finally got the clutch from Summit Racing today.  The original one was damaged and the second was shipped or routed incorrectly by UPS.  The clutch & pressure plate is from Centerforce along with the billet flywheel and throughout bearing, the model I choose was the DFX.

 
I purchased a used Lakewood housing and then sandblasted and did a bit of clean-up before repainting red.  Overall a little work along with some new bolts and it turned out nice.


Finally the engine and transmission are together!  I was able to use the clutch z-bar to release the clutch and then maneuver the transmission to slide into place without any issues.


After the transmission I then went back and finished using the glass bead on the intake manifold which now looks good as new again.  The pictures below finally show the chassis, engine and trans out in the sunlight for the first time in several years.  There's still quite a bit of work to do to finish but after just a few weeks it's really starting to come together.


Here you can see that I still need to build a custom transmission cross-member.   I have some 1 1/2" x 3/16" tube so that will be the next project.


Another area I ran into problems was the clutch z-bar.  The difference in angles is just too much to make everything work correctly.  In addition, the clutch rod that runs to the transmission is too close to the engine so I'm going to move it inward 1/4"


Tuesday, October 30, 2012

Motor meets Chassis....

Today was a major milestone for the restoration in that I was able to drop the motor into the chassis after several years (nearly 5) since I startd the project. It only took 5 minutes to get them connected .... 


Monday, October 29, 2012

Final Engine Assembly

I bought a Summit Cam degree kit and spent several hours trying to figure out how to get it timed and use the kit and then a few more hours actualy verifying the correct specs from the Comp Cam card.  In the end it was perfect and didn't need any adjustment but it certainly taught me a lot about the precision of the camshaft.


Below is a nice shot of the heads with the new Manley valves.  The previous owner had work done to the heads on the intake and blending the bowls so they actually turned out quite nice.


Here you can see the shot after the first head was installed and preparing for the second.  The next shot shows the Fel-Pro PermaTorque multiple layer steel head gasket.


Finally putting the oil pan on the motor.  The first gasket that I had was a one-piece from Fel-Pro but it was just too thick to work so I went with the traditional 4-piece and plenty of gasket sealer.


A nice picutre with the heads and retangular port intakes!

 
All taped and ready to paint, it took about 3 hours to get everything taped up nice...

 
Hers' the result after 2 cans of Dupli-Color Chevrolet Orange, there were still some light spots so I purchased another can and covered the motor again.


Now I need to finish using the blaster (glass bead) on the intake manifold to give it a nice finish and then the motor should be ready to bolt up to the frame.  I have some work to do on the used Lakewood bellhousing to clean it up and paint as well as remove the nuts that were welded to the plate.  Once that is completed I have everything needed to merry the engine & trans and then finally set inside the rolling frame!

Sunday, October 21, 2012

Engine Assembly & Rearend

WOW, it's finally time to assemble the engine. 
 
I dropped off the parts right after labor day and got them back after a long 6 weeks.  The first step was to layout the parts for assembly and do some cleaning to ensure the parts are ready to go.  Below you can see all of the parts laid out on the floor the only unfortunate thing is that the windage tray and stud kit had to be returned.  
 

The machine work was completed by E&G Automotive in Wallingford, they did a great job with he machine work!  Everything mic'd out perfectly fine and the block and all parts were ready to assemble.


Below are pictures after the crank, rods/pistons and cam were installed.  I checked the main bearing clearance with plastigage and it was right on the spec at 0.003.   I also checked the rings and everyone was fine except the #6 cylinder top ring that I had to file with the oil ring gap of 0.015, the 2nd ring 0.020 and the top ring 0.017.  I used the dial indicator from the cam degree kit to check the crank endplay and it was 0.006.


Here's a view from the bottom, below the oil pump you can see the plat that should help keep the oil from splashing the rear main during take off :)  Otherwise nothing special here, just a good Melling oil pump and rod.


Here you can get a real perspective of the dome and compression, notice the #6 piston at TDC, the pistons are SPR 73, which I think based on the 118cc head should put the compression ratio at about 12.25:1 to 12.5:1.


In addition to the engine I also got the rearend back on Friday.  It was rebuilt with a 4-series posi holding 4.10 gears.  The rearend had to be straightened and overall I think it came out quite nice given how it started out.   I had to remove the ladder bars and coil spring struts that were welded on the rearend and then install the factory brackets.    I added the QA1 anti-hop bars along with adjustable uppers and then the F41 boxed lower control arms along with the sway bar.  There's new coil springs and I'll be adding Competition Engineer adjustable shocks.


Here's a close-up of the QA1 anti-hop bars which change the upper mounting point by about 3 inches which should give a much better angle and also provide more adjustments.